Translate

Showing posts with label homemade paper. Show all posts

Saturday, May 21, 2011

Homemade green paper today!

Well, the grandkids went with their Dad today, which afforded me the luxury to go to lunch with my husband and my Mom. We went to a Puruvian restaurant, which is similar in feel to Cuban. We had baked chicken, black beans, yellow rice, fried yucca, and sweet plantains! It was all delicious and we left there as full as ticks!

Then I decided it was paper makin time again! This time, I added a piece of blue and a piece of green construction paper to my shredded white paper, and this is how it turned out. It looks nice. I put a few of my pink sheets next to them, so you could see them all together. Not so much of the blue showed up, but there is a little glitter to the mix due to the one piece of paper having a sort of built in glitter, and I also see bits of a red color in there (no idea where that came from)...and again, I love how some of the shredded white that had words on them came through...very nice!

I wanted to tell you that I have kind of developed a new way to clean house on paper making days! I first run in the kitchen and put to boil all my shredded papers, then turn off the heat while I go and do a few chores. Pick up, run the vacuum, or start a load of laundry, etc. Then later, when it has cooled a bit, I run in and put the paper/water mix in the blender and grind to a pulpy mess. The I leave again and do a few more chores.

When I come back, it is time for the actual making of the paper. I get my new wet sheets of paper out on the towels on the table, and then I clean up a bit, and do more chores, then finally I come back and iron the paper under a hankerchief...to dry.

Paper is made, and house and chores are done...or nearly. You know with a 2 and 6 year old around, they are never done...but yet I get a lot of satisfaction by just making a dent!

Have a great Sunday tomorrow!!!
xoxo- Julie

Wednesday, May 18, 2011

How to make homemade paper like the ones in my previous post.

Upon the request of some of you who read my blog...I was going to type out how I made my paper, but I decided, instead to give you the most awesome paper making site that inspired me to make paper with just a piece of screen...so easy!

I had made myself a kind of "holder" for my screen, to press the water out of, but in this video, I found I really didn't need anything but the screen! That was very liberating. The only thing I found, is that you will need one other person to help you lift the screen with pulp all over it, out of the water, and hold it taught while the water drains out, and then you lay it on top of some newspapers to absorb.

So here is the video that shows how to make paper just using a piece of screen:


Unlike in the video, prior to placing my pulp (while it was real wet on the screen), I placed it on newspapers and covered it with a peice of felt and squeezed all the water out by pressing down with a sponge all over it. THEN I moved it to the towel.

If you scroll to below the video on THIS PAGE, you will see many other ideas/suggestions for your paper. I hope you have a lot of fun, if you choose to try it!
xoxo- Julie

Tuesday, May 17, 2011

New colorful homemade paper!!!

I got home from a hard days work, and immediately we left for dinner. The minute I got back home, around 7pm, I knew I had to try a new paper experiment. I had watched a YouTube video last night where the paper maker had added a piece or two of colored construction paper... well...that called my name subconsciously all day until I had to have a go at it!

I even did it at the table inside, rather than in a wheelbarrow outside! It all worked out and was much easier and cleaner. You can even see some letters in the white papers I put in. I think I blended it just the right amount of time to leave a little larger pieces of color in there.

I threw in a piece of red and a piece of orange construction paper, and one of those sheets had embedded silver sparkles. I threw in about 5 cups of shredded white paper from my shredder machine. After I ground it up in the blender (to a pulp), I added a handful of dried rose petals, which really added a lot of dimension.

These sheets are not completely dry yet...and it was hard to get a good clear shot of them...but they are really neat looking! I think I will try a few sheets with blue and green added, and a few with blue and purple. The sky's the limit on this! I am even wondering now how they would look made in to paper beads!!! That's next!

Saturday, April 16, 2011

First try at homemade paper!

I finally got bold and took matters by the hand around here! I have been wanting to try to make homemade paper from my shredded stuff for weeks, but something always stopped me! Finally, I just started the process and made due as I went.

First I made a big pot of the shredded paper from my shredding machine...mostly white but a few other colors mixed in as well.

I boiled it gently for a while, then left it sitting on OFF for a few hours while I went away for a while.

When I came back, I put three batches of my shredded stuff, with water added (enough to make it easily blendable) into my Vita Mix blender. It turned to pulp almost immediately.

I poured it into a large pot, and took all of it out to my wheelbarrow out under a tree in the backyard. Poured it in, and added more water with the hose, until I had a nice watery/pulpy mixture (I guessed on the consistency, but it seems I did OK on this).

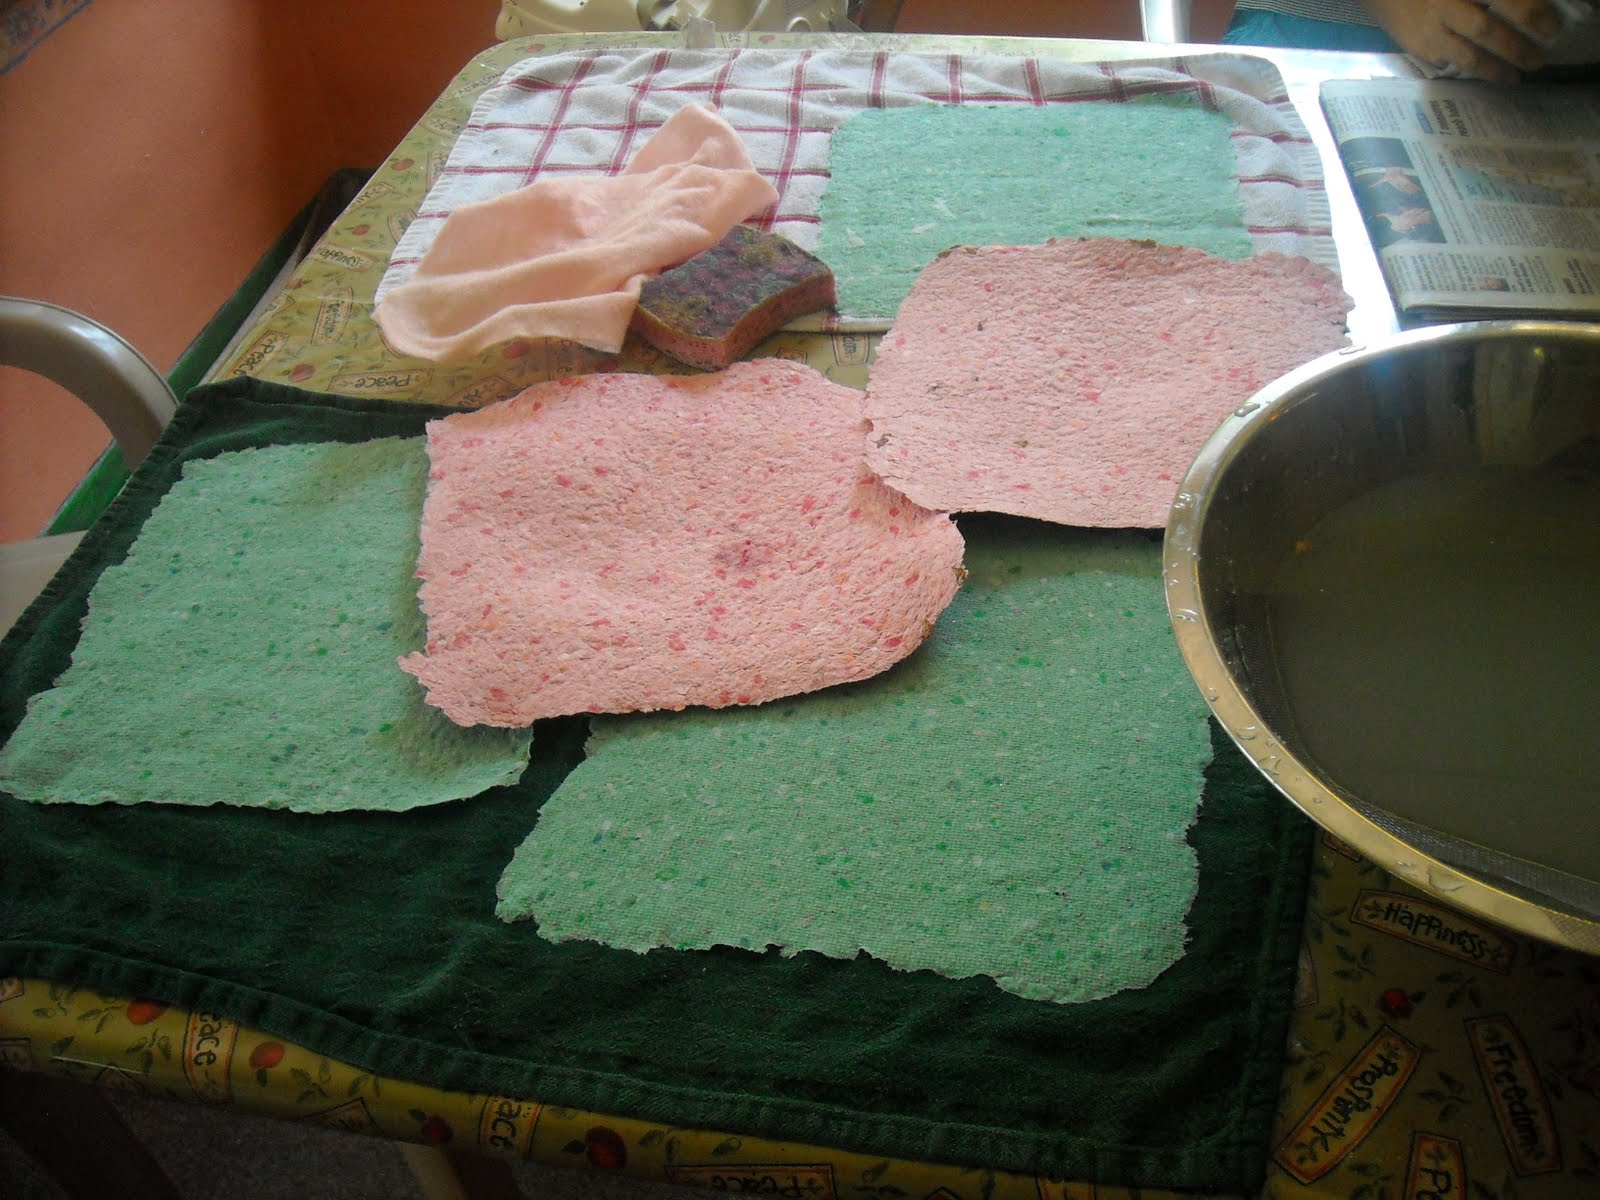
Now, I know a lot of people use an old picture frame, and remove the glass, etc, and staple a peice on screen on the bottom, but I wanted something stronger...so I used a flat bottomed grill basket for vegetables. It has larger holes all over it to allow the water to run out. It has a flat bottom that is about 7 inches square.

I cut a peice of nylon screen to fit into the bottom, and then I just held the screen in place while I scooped my basket down into the wheelbarrow and got a layer of watery pulp over the top of the screen, as even as I could.

I let a lot of the water drip out the bottom, then I sat the basket on the grass, and used a peice of white felt to cover the top. Then you take a sponge and press down repeatatively all over the surface to press out all the water. I had to keep squeezing the sponge after one or two presses to keep it as dry as I could as I kept pressing more and more water out. You can tell when you are not really pressing much out anymore.

Then I took the basket in the house to the table, where I turned it upside down over a towel. I used a pencil to poke through the holes in the grill basket to push the screen out and the paper and screen would fall onto the towel.

I let my sheets of wet paper lay there for a few hours...(mainly due to having to attend to other things...and came back later to dry the sheets. I did that by placing them on a dry towel and covering with one of my husbands hankerchiefs, and pressing with a dry iron over and over...moving until I felt it was fairly dry on one side, then turning and repeating until they were fairly dry.

Now I just have to wait a few days (probably) with them in the airconditioning, to finish drying completely.

Oh...please remember that this was my first time. I think there is another ingredient you can throw in to make the paper behave better with ink (when you write on it)...and I want to say it is glycerin (But I must research before I can say for sure). I added a few drops of food coloring onto the surface of the paper when I first pulled it out of the pulp/water bath, and before pressing with the felt and sponge. I thought it would have swooshed the color more than it did, during thins water stage, so I am going to make more tomorrow and add some ingredients...like grass, flower petals, and glitter (just a little).

Will let you know how it turns out. This was fun...seriously fun. OH...and I have a question for you? I like the sort of deckled edges for an artsy look, but what do you think...should I cut them to be like straight paper edge, or leave artsy? I am trying to think of how I could fashion them into a journal and not lose the neat edge aspect. Any ideas???